-Seeing as some players have limited comprehension skills I will try to explain to them(And you) something about commanding. The following is a rendition of the final stages of a game played on Fool's Road where I commanded the Militia side.
-After fighting for the majority of the game around Train Depot and Hilltop Estate we had finally managed to neutralize Warehouse and were trying to cap it fully. At this point we had a little over 100 tickets and the Brits had around 180. The majority of the Militia Squads had advanced to Warehouse and were about to cap it but we had Brits advancing to the north and east and were barely holding on to the flag(I had to go there myself a little earlier in order to keep it neutral). This is how it looked(Blue is Militia and Red is Brits):
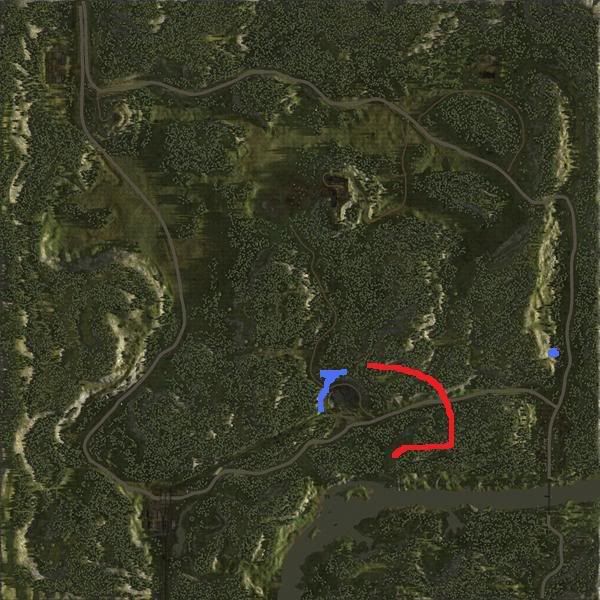
-At this time the aforementioned player(s) started whining about my order to have everyone defend Warehouse. Here's the first lesson you need to learn: You don't know everything the Commander knows. The blue dot on the right side of the map is a Firebase and Squad 4, who were positioned there. I allowed them to go to the Village and try to cap it if they were able to do so without losing the whole squad. If they lost the squad they would have to fall back to Warehouse and defend. At this point we had 97 tickets and the Brits had 177 tickets.
-Next lesson: Activating the enemy's ticket bleed isn't cost effective if you lose too many soldiers while trying to take the objective.
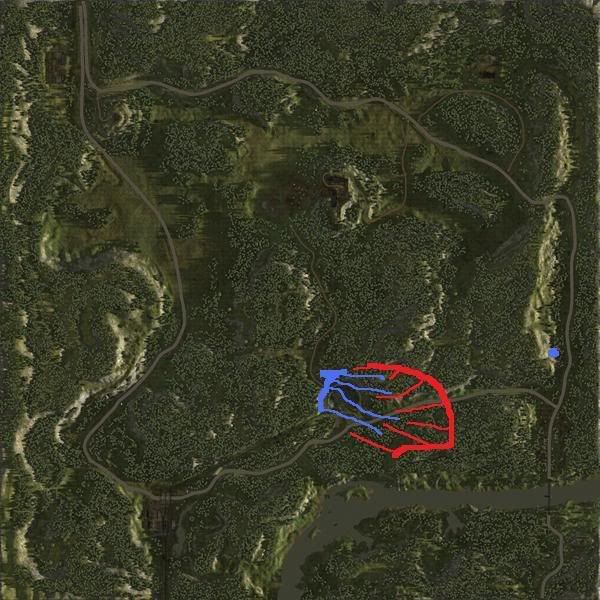
-The Brits were pushing on Warehouse and I needed as many people there defending it as possible. I couldn't have just 2-3 squads defending because the whole damn British Army was attacking Warehouse and had I done that there would have been way too many tickets lost due to deaths as a smaller force can defend against a smaller force but they will lose more soldiers in the process. Also, a larger defending force means the enemy will lose more soldiers in the process of attacking. We had two options; defend Warehouse and win on death count or cap Village. However, a frontal assault on Village would not be cost effective as it meant we had to push through the entire British force. Spawning in a large force at the Firbase on the right side of the map was also impossible as the loss of defensive forces at Warehouse would mean that the Brits could take Warehouse(They were Brits all over the slope north of Warehouse and some inside the flag cap radius at all times). Therefore Squad 4 was allowed to take Village provided they didn't lose the entire squad.
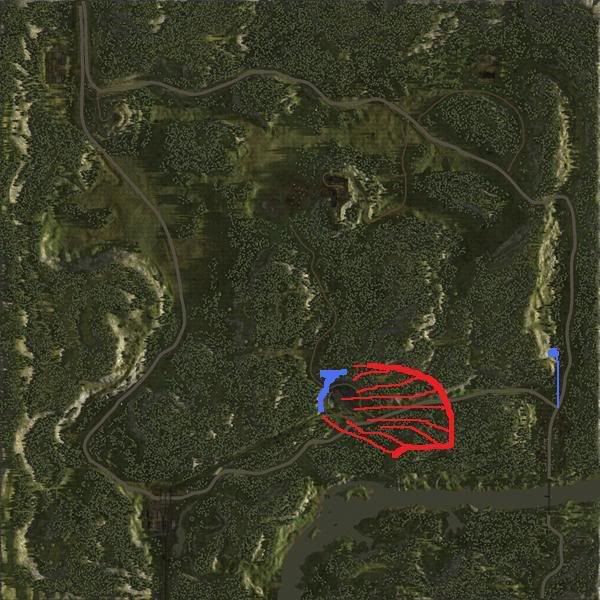
-And this is how the plan worked out. Squad 4 moved into Village while the other squads stayed on defense at Warehouse, taking out any advancing Brits. I had assumed that the Brits would have someone on the last flag to defend it and the main plan was to hold and defend Warehouse, but as luck would have it they seemed have everyone at Warehouse and Squad 4 managed to cap Village(Without any casualties I think). At that point the British army turned around and started moving on Village and I sent all the Squads defending at Warehouse East to attack their rear.
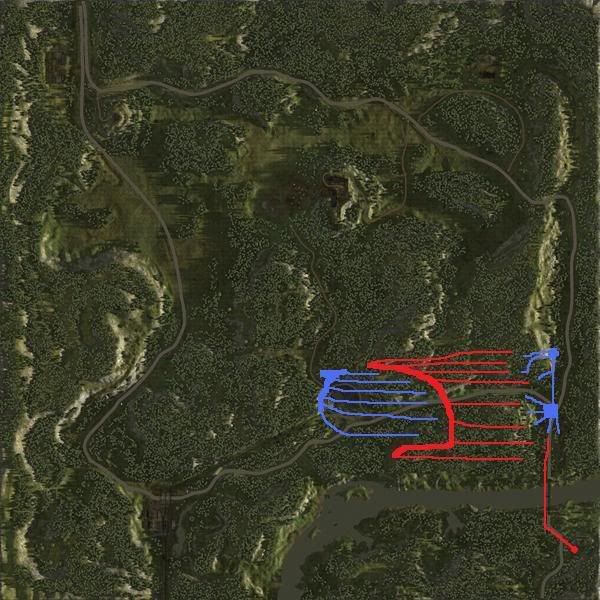
-Now we could attack on several fronts, inflicting heavy losses on the Brits. That, along with the Ticket bleed from taking Village caused us to win the game with something like 19 tickets left. If you have a basic grasp of math you should be able to understand that "OMGZ ALL ATACK VILAG" would have failed miserably as we would have lost a lot more than 19 people pushing through the Brit army. Aforementioned person(s), do you comprehend?
Please do respect your Commanders as what you see is rarely the full picture and the CO has to take a lot more into consideration than you do.


 Jaymz
Jaymz