[AAR] 25vs25 PCW on Barracuda
Posted: 2011-07-05 16:17
Sup guys, I dont really play anymore but have a great history with a larger clan thats a fairly laidback BF/PR community. We did regular PCWs 25vs25 with another friendly community and was pretty back and forth. We had planned a Barracuda PCW, first game us being on US. We agreed to have Docks as a certain flagpoint(reset server till it was there and rest random) on both maps. 3 of the more ambitious players gathered to plan out the match, me being one of them. Ive chosen to keep both clans anonimous at this point.
Plan layouts made with tacticum:
http://img691.imageshack.us/img691/4939/finalphase1.jpg
http://img16.imageshack.us/img16/7138/finalphase2.jpg
http://img22.imageshack.us/img22/5830/i ... layout.jpg
The plan:
The Assault on the Docks:
Phase1:
Three squads. Two people from each squad spawns in on carrier, rest spawns after insertion on the beach. The assault is fullout, we need to clear the docks ASAP.
Pic of the first insertion point:
http://img20.imageshack.us/img20/107/insertion.jpg
The second insertion point is shown on the map.
Phase2:
Establish a safezone in the docks, well be spreading the infantry to ensure coverage. The bridge will be blown by then. SLs will be deploying green smoke for crates. Both squads should acquire a marksman kit and Build the firebase, stationary guns and foxholes. Defend until further instructions. Squad three will be standby, defending at first and easily relocated for recon or attack at a lightly defended spot.
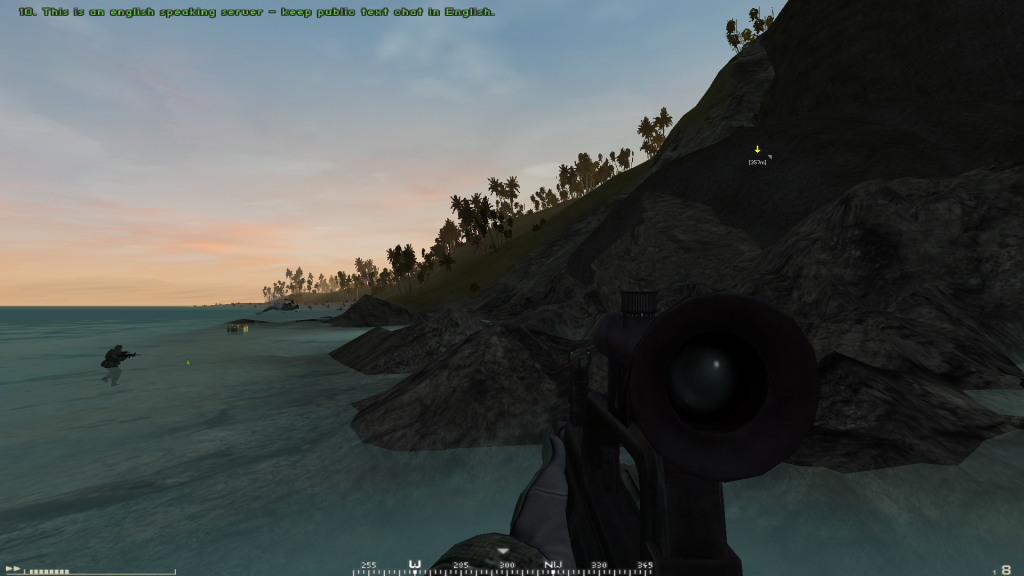
The Sniper and Engineer
Phase1:
The sniper will be assisting the engineer at first, without the sniperkit. You and engineer will be inserted at docks with the rest of the infantry, blowing the bridge. Return to the beaches for extraction as shown on the map.
Phase2:
Youll be flown down south with the engineer to build a firebase in the cave. Make sure you know where we planned it. Build the firebase, acquire your kit from the crates and move to your spot. Youll be covering the area west of the docks(swamp area) and the fortification right west of you. The fortification contains a truck spawn and a stationary AA gun. Eventually, well be taking out the AA gun with your assistance. Your initial task, will be covering the swamp area, passing through info to commander about incoming hostiles and FOB positions. The area is highly trafficked, should be plenty to do. Its absolutely important that you stay silent, and do not shoot anything, unless asked of you by the commander. If stationary AA guns are manned, keep an eye on it, until youre asked to take it out, well then take out the gun with a prescision strike.
High Priority Targets: AA(stationary and kits), FOBs and passing infantry.
Beware of: Hostiles behind you on the hill and check if the AA gun is manned or not.
Pictures of your line of sight is here:
http://img21.imageshack.us/img21/4033/sniper1y.jpg
http://img4.imageshack.us/img4/4954/sniper1v.jpg
http://img20.imageshack.us/img20/548/sniper3iu.jpg
http://img20.imageshack.us/img20/476/sniper3m.jpg
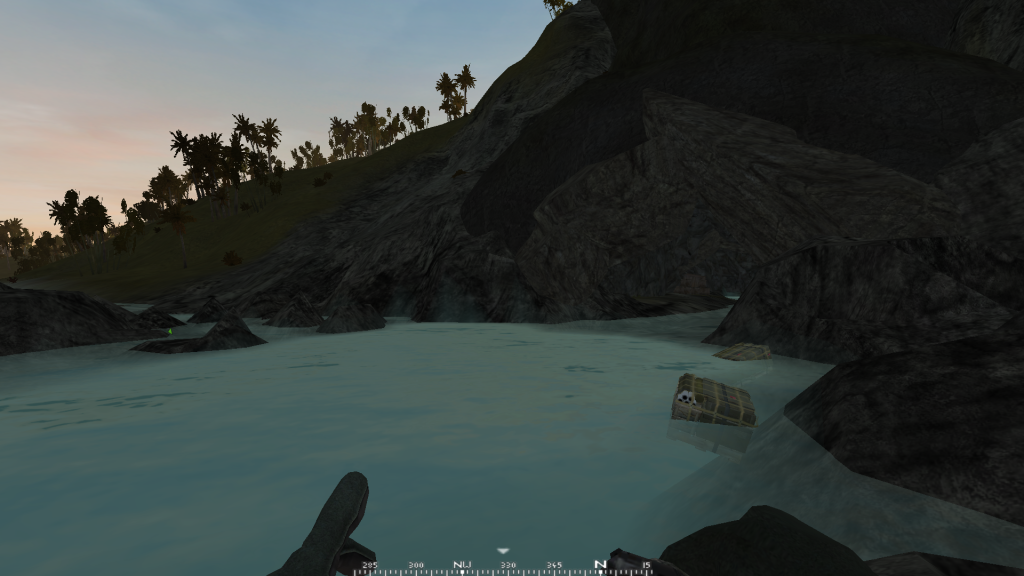
The Caved FOB
Pictures here:
http://i237.photobucket.com/albums/ff22 ... VEFOB2.png
http://i237.photobucket.com/albums/ff22 ... VEFOB1.png
Hueys
Phase1:
One attackhuey and two transport hueys will be inserting troops, with the attack huey hovering over the water, in the safezone. The atk huey will be called in, IF the engineer dies and fails to blow bridge, and IF one infantry squadleader feels a huey strike is safe enough.
After dropoff the transport choopers, will be flying through the canion to drop crates on a cave at the waterfalls, make sure you know exactly where, do it quick to avoid attention and escape southeast to carrier.
Phase2:
transport engineer and sniper from the east beach to the crate location(not too close). And the spare transport huey joins his infantry squad. RTB for further instructions or atk huey.
Additional planning and testing:
Prematch we spent a few hours testing the flight time from carrier to docks with long warmup and short warmup. Also tested the time for buggies and trucks to reach docks from main. It had shown to be fairly equal although it was a possibility that they coulkd have an AA kit out to docks with a buggie before we reached docks. A medium warmup time was chosen as it was quick enough and provides agility once you enter the dangerzone.
Exploring the southern caves for the engineer and sniper to infiltrate, aswell as crate dropping the right spots was researched.
The sniper i had assigned to me and one other planner was assigned engineer. The reason is that if everything was to go apeshit, we didnt have a although crucial not as active role in the plan. So that provided us flexibility to replan and dedigate.
I wrote down this plan for our forums from what the three of us had drawn up. As you can see im very particular with this stuff, effectively you want your players to almost have played the full match out in their minds once they get there. As we were a fairly laidback community youd also expect casual players and so the more prepping the better.
We decided that an allout assault on one point especially the docks was most reliable. If you dont get two feet on the island, you could get knocked off, they start taking down your hueys and suddenly youre degraded to boats. Not reliable. Docks we felt was easiest defendable aswell as a good position on the island.
The match played out as follows:
the 2 hueys went towards the docks, landed safe and the squads were spawned. They met resistance from a bout a full size hostile squad with one buggie. Docks was taken over with the assistance of the ATK huey without more than 2 casualties. So initial assault was flawless. The bridge was exploded successfully.
Shortly after the engineer and I were picked up and dropped off south of the island in the water. We began infiltrating the caves going into the center of the island and setting up the waterfall FOB with the dropped supplies.
The engineer quickly got mines out and continiously took out trucks and jeeps going westward of the main, cutting off their supplies to the island. I started scouting and found little to no activity on the western part of the island. We did find a FOB setup on the fortification and the engineer and I, partnered with the atk huey began decimating them, was tougher than expected.
Defensive positions were setup in the docks and soon after attacks started coming in. We started out getting attacked frm all sides but as they were deflected, the attacks came from their main base. It is here that we believe the enemies made a wrong turn. They started just spawning at the main base instead of the rest of the island. THis meant that we could easily expect them to come from one and just one side and made our defensive systems effective.
As not much more work needed to be done by the engineer and I, we began to taunt the enemies. I pickup a grapplehook and we hooked into their main base. We placed mines and C4 at their trucks and jeeps, took a picture of the commandertruck, blew their stuff up and left. We then started taking out defensive FOBs and flanking their continious attacks towards the docks. The engineer soon after had mines laid out in front of their main and took out jeeps and trucks.
I sort of fell into defending aswell by targeting for JDAMs and helping counterattacks.
We passed with flying colours and our plan had shown to be flawless. The great detail put into the plan by the three of us proved to be worth while.
One of the biggest leasons we learned on prior matches, was that you really need a flexible tactic. We did plan accordingly, but it showed not to matter.
Hope you had a good read, terenz.
Plan layouts made with tacticum:
http://img691.imageshack.us/img691/4939/finalphase1.jpg
http://img16.imageshack.us/img16/7138/finalphase2.jpg
http://img22.imageshack.us/img22/5830/i ... layout.jpg
The plan:
The Assault on the Docks:
Phase1:
Three squads. Two people from each squad spawns in on carrier, rest spawns after insertion on the beach. The assault is fullout, we need to clear the docks ASAP.
Pic of the first insertion point:
http://img20.imageshack.us/img20/107/insertion.jpg
The second insertion point is shown on the map.
Phase2:
Establish a safezone in the docks, well be spreading the infantry to ensure coverage. The bridge will be blown by then. SLs will be deploying green smoke for crates. Both squads should acquire a marksman kit and Build the firebase, stationary guns and foxholes. Defend until further instructions. Squad three will be standby, defending at first and easily relocated for recon or attack at a lightly defended spot.
The Sniper and Engineer
Phase1:
The sniper will be assisting the engineer at first, without the sniperkit. You and engineer will be inserted at docks with the rest of the infantry, blowing the bridge. Return to the beaches for extraction as shown on the map.
Phase2:
Youll be flown down south with the engineer to build a firebase in the cave. Make sure you know where we planned it. Build the firebase, acquire your kit from the crates and move to your spot. Youll be covering the area west of the docks(swamp area) and the fortification right west of you. The fortification contains a truck spawn and a stationary AA gun. Eventually, well be taking out the AA gun with your assistance. Your initial task, will be covering the swamp area, passing through info to commander about incoming hostiles and FOB positions. The area is highly trafficked, should be plenty to do. Its absolutely important that you stay silent, and do not shoot anything, unless asked of you by the commander. If stationary AA guns are manned, keep an eye on it, until youre asked to take it out, well then take out the gun with a prescision strike.
High Priority Targets: AA(stationary and kits), FOBs and passing infantry.
Beware of: Hostiles behind you on the hill and check if the AA gun is manned or not.
Pictures of your line of sight is here:
http://img21.imageshack.us/img21/4033/sniper1y.jpg
http://img4.imageshack.us/img4/4954/sniper1v.jpg
http://img20.imageshack.us/img20/548/sniper3iu.jpg
http://img20.imageshack.us/img20/476/sniper3m.jpg
The Caved FOB
Pictures here:
http://i237.photobucket.com/albums/ff22 ... VEFOB2.png
http://i237.photobucket.com/albums/ff22 ... VEFOB1.png
Hueys
Phase1:
One attackhuey and two transport hueys will be inserting troops, with the attack huey hovering over the water, in the safezone. The atk huey will be called in, IF the engineer dies and fails to blow bridge, and IF one infantry squadleader feels a huey strike is safe enough.
After dropoff the transport choopers, will be flying through the canion to drop crates on a cave at the waterfalls, make sure you know exactly where, do it quick to avoid attention and escape southeast to carrier.
Phase2:
transport engineer and sniper from the east beach to the crate location(not too close). And the spare transport huey joins his infantry squad. RTB for further instructions or atk huey.
Additional planning and testing:
Prematch we spent a few hours testing the flight time from carrier to docks with long warmup and short warmup. Also tested the time for buggies and trucks to reach docks from main. It had shown to be fairly equal although it was a possibility that they coulkd have an AA kit out to docks with a buggie before we reached docks. A medium warmup time was chosen as it was quick enough and provides agility once you enter the dangerzone.
Exploring the southern caves for the engineer and sniper to infiltrate, aswell as crate dropping the right spots was researched.
The sniper i had assigned to me and one other planner was assigned engineer. The reason is that if everything was to go apeshit, we didnt have a although crucial not as active role in the plan. So that provided us flexibility to replan and dedigate.
I wrote down this plan for our forums from what the three of us had drawn up. As you can see im very particular with this stuff, effectively you want your players to almost have played the full match out in their minds once they get there. As we were a fairly laidback community youd also expect casual players and so the more prepping the better.
We decided that an allout assault on one point especially the docks was most reliable. If you dont get two feet on the island, you could get knocked off, they start taking down your hueys and suddenly youre degraded to boats. Not reliable. Docks we felt was easiest defendable aswell as a good position on the island.
The match played out as follows:
the 2 hueys went towards the docks, landed safe and the squads were spawned. They met resistance from a bout a full size hostile squad with one buggie. Docks was taken over with the assistance of the ATK huey without more than 2 casualties. So initial assault was flawless. The bridge was exploded successfully.
Shortly after the engineer and I were picked up and dropped off south of the island in the water. We began infiltrating the caves going into the center of the island and setting up the waterfall FOB with the dropped supplies.
The engineer quickly got mines out and continiously took out trucks and jeeps going westward of the main, cutting off their supplies to the island. I started scouting and found little to no activity on the western part of the island. We did find a FOB setup on the fortification and the engineer and I, partnered with the atk huey began decimating them, was tougher than expected.
Defensive positions were setup in the docks and soon after attacks started coming in. We started out getting attacked frm all sides but as they were deflected, the attacks came from their main base. It is here that we believe the enemies made a wrong turn. They started just spawning at the main base instead of the rest of the island. THis meant that we could easily expect them to come from one and just one side and made our defensive systems effective.
As not much more work needed to be done by the engineer and I, we began to taunt the enemies. I pickup a grapplehook and we hooked into their main base. We placed mines and C4 at their trucks and jeeps, took a picture of the commandertruck, blew their stuff up and left. We then started taking out defensive FOBs and flanking their continious attacks towards the docks. The engineer soon after had mines laid out in front of their main and took out jeeps and trucks.
I sort of fell into defending aswell by targeting for JDAMs and helping counterattacks.
We passed with flying colours and our plan had shown to be flawless. The great detail put into the plan by the three of us proved to be worth while.
One of the biggest leasons we learned on prior matches, was that you really need a flexible tactic. We did plan accordingly, but it showed not to matter.
Hope you had a good read, terenz.