
I played a perfect game on TG (Ramiel before it crashed multiple times) with the help of my spotter (Birdie) and also everybody else who saved our asses 2 times
The others are old sniping scores that i got on different servers
[AAR] Jigsaw's Zero Death Challenge
-
hotfranc
- Posts: 57
- Joined: 2009-05-14 20:12
Re: [AAR] Jigsaw's Zero Death Challenge
You do not have the required permissions to view the files attached to this post.
Last edited by hotfranc on 2010-06-03 10:24, edited 1 time in total.
-
Arnoldio
- Posts: 4210
- Joined: 2008-07-22 15:04
Re: [AAR] Jigsaw's Zero Death Challenge
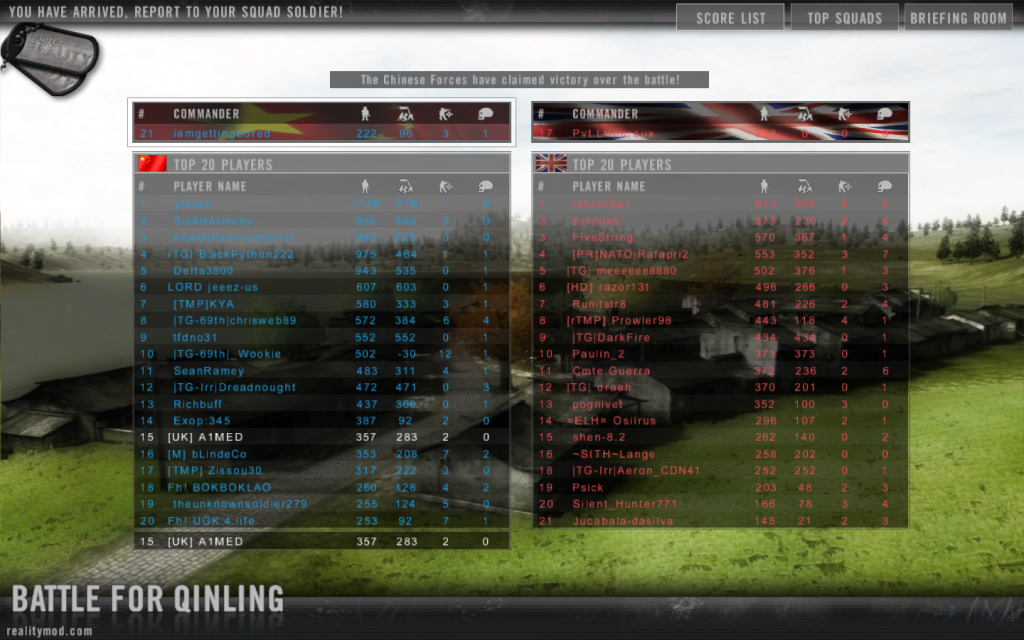
Tactical Gamer - Qwai River - PLA
The objective was Jingamen or something, the main village. That was the center of battle.
The battle seemed to be on their side but our team didnt give up so much and we won. By quite a lot.


The objective was Jingamen or something, the main village. That was the center of battle.
The battle seemed to be on their side but our team didnt give up so much and we won. By quite a lot.

Orgies beat masturbation hands down. - Staker
-
blaat123
- Posts: 26
- Joined: 2007-09-12 15:16
Re: [AAR] Jigsaw's Zero Death Challenge
Went through a couple of my screenshots, found some zero death ones.
Some old ones there as well.


Some old ones there as well.
-
Silly_Savage
- Posts: 2094
- Joined: 2007-08-05 19:23
Re: [AAR] Jigsaw's Zero Death Challenge
Scoreboards are boring, try to at least give a small description of each...  ??:
??:
Tactical Gamer - Operation Barracuda - U.S.M.C.
Just got done playing a round of Barracuda with db as our SL.
Our first objective was the airstrip on the southwestern corner of the island. We were working alongside another squad led by Portable.Cougar, with an APC crewed by |TG-X|Marine and |TG-69th|xsoldier supporting us.
On the carrier, we loaded up in ThirdSin's and Celestial1's Hueys and landed just north of the airstrip. As we crept up the low hill to get eyes on the flag, we noticed that practically their entire team had spawned on the flag and was preparing a massive fortification around the control tower with foxholes, AA, TOW, and HMG positions covering every vector of approach.
We set up our squads on the opposite end of the runways with just our heads sticking over the crest. We were to hold our fire until the APC arrived to back us up. Once the APC arrived, we all started firing on the TOW emplacement, instantly killing the gunner. Our squad loaded up in the APC to rush the control tower while Cougar's squad laid down some heavy suppressive fire. We made a mad dash into the hangar closest to the tower. However, just as we all exited the APC, it took a fatal AT round and the crew had to bail.
With Cougar still suppressing, we rushed the objective and killed the remaining occupants. It was brilliant, I only wish db would have recorded it...
Skip a few assaults later and we're now attacking the major trench system south of North Rock Fortification. Again, it's crawling with enemies and emplacements of every kind. Only this time, we're doing it without APC support. Once again, Cougar's squad suppressed while we assaulted. Our first attempt at attacking head-on ended in disaster, with our entire squad sans myself being wiped out. I fell back to the trenches Cougar was using as cover due west of the enemy FOB. It didn't get much better after that though. My squad regrouped on the carrier and were flown back in... directly on top of the enemy. Needless to say, they didn't make it more than a few feet out of the chopper before being gunned down.
We are now on our third assault on the trench system, and we've decided to switch roles, Cougar's squad will now be attacking while we provide covering fire. Our squad makes it to the hill overlooking the trench system from the south. We start pouring on the fire while Cougar moves in with our newly spawned LAV. The enemy retreats into their defensive positions and begin laying down a smoke screen. We're blinded but continue to shoot into the smoke until it disperses. Once the smoke has settled, we see bodies laying every which way. Cougar moves in and cleans up the rest while we reload and reposition.
At this point the enemy is down to their last flag, PLA Missile Silo. We gather up our squads in two Hueys and begin our approach while the APC trucks it up the road to meet us there. As we're touching down, we immediately exit the chopper and sprint over to the stairwell leading down into the silo. However, we then run into a roadblock, literally. The enemy has barricaded themselves in using multiple layers of wire. As we incendiary the wires and descend deeper into the stairwell, we can hear the enemy moving around beneath us. Just then you can make out the faint sound of something metallic clinking off the cement... *BOOM!*
One grenade just took out fourteen men... Needless to say it was a disaster. Bjoffe and I managed to survive and started to get the revives going. However, the enemy then rushed down the stairs from above us and wiped out the friendlies who were just revived. Luckily for us reinforcements arrived and the upper stairwell was clear of hostiles. We made our way back up to meet up with the rest of our squad whom just landed next to us.
With so many friendlies on the objective, the flag quickly turned in our favor. Just as the round was ending, Portable.Cougar decided to build a FOB...directly above the enemy camping the bottom of the stairwell. Just as it spawned, you could hear the enemies screaming out below us as the base of the FOB somehow managed to kill them. I haven't heard so many people laughing at once over Mumble in a long time. It was the perfect way to end the round.
Ending screenshot:
"Jafar, show me a sniper rifle." - Silly_Savage 2013
-
Aimed
- Posts: 936
- Joined: 2009-03-12 03:17
Re: [AAR] Jigsaw's Zero Death Challenge
you guys got really lucky in that round, you capped out the flagged right as we were waiting for our arty to become available and were going to drop it on our own heads in the bunker lol
great thing right as the end was you had a few guys in the tunnel, one of them was trying to surrender thinking we wouldn't open the doors. but we did just for him to turn around with his hands up and to see a line of chinese soldiers tearing him to shreds
what was strange though was all our vehicles were randomly blowing up in the bunker, we had 2 transport trucks, a supply truck, 2 jeeps and 2 vn-3's but they all kept blowing up from nothing
that was our protection
I've had a couple rounds lately where I've been going 0 deaths
As medic about 40 mins ago for chinese
Combat Engineer running a ambush squad
Marksman for americans, spent most of the time spotting targets for sniper and recon
Chinese Hat, i was actually wounded when the round ended, i knew the game was going to end so didn't give up so i could get the 0 death challenge
#DeleteMuttrah
-
Jigsaw
- Posts: 4498
- Joined: 2008-09-15 02:31
Re: [AAR] Jigsaw's Zero Death Challenge
Scoreboard screens of your leetness are not what this thread is about, we want to hear about your exploits and learn how you have managed to get through entire rounds with 0 deaths.blaat123 wrote:Went through a couple of my screenshots, found some zero death ones.
Some old ones there as well.
Notice for example how Savage slowly lengthens his e-peen by spreading out the story by telling you how the round has progressed and what he has done before finishing it with the flourish of a scoreboard for proof.
Ofc, War and Peace is not required, but a little narrative is awesome
Keep them coming anyway lads.
http://www.youtube.com/watch?v=8CKjNcSUNt8
"I love the smell of napalm in the morning. You know, one time we had a hill bombed, for 12 hours. When it was all over, I walked up. We didn't find one of 'em, not one stinkin' dink body. The smell, you know that gasoline smell, the whole hill. Smelled like... victory. Someday this war's gonna end... "
"I love the smell of napalm in the morning. You know, one time we had a hill bombed, for 12 hours. When it was all over, I walked up. We didn't find one of 'em, not one stinkin' dink body. The smell, you know that gasoline smell, the whole hill. Smelled like... victory. Someday this war's gonna end... "
-
Silly_Savage
- Posts: 2094
- Joined: 2007-08-05 19:23
Re: [AAR] Jigsaw's Zero Death Challenge
Tactical Gamer - Kozelsk - Russia
As the round deployment time was ticking away, I joined Portable.Cougar's infantry squad. We decided to pair up with Boogy's infantry squad and REad's BRDM squad. We hitched a ride with the BRDMs to the main road east of the Russian main as Boogy set off on foot. Once they caught up with the rest of us, we all started moving on our first objective: Militia Training Camp. Our BRDMs provided overwatch as the infantry moved up, berm by berm. As we got within view of our objective, we started receiving small-arms fire from within the camp.
Boogy decided to assault the flag from the west while we took it from the south. Through bounding overwatch, we managed to make it to the outskirts of the village with minimal casualties. After breezing through the remaining hostiles and reviving the friendlies that went down, our BRDMs chose to scout ahead to make sure the path to our next objective was safe. It wasn't. They were ambushed by waiting technicals and the little tin-cans just weren't able to withdraw in time. We were stranded without transport so we decided to hoof it to Tunnels, the next flag in play.
At this point, we met up with another squad to attempt a simultaneous two-pronged assault on Tunnels. Our squad, along with Boogy's would attack from the north, while the third squad, led by |TG-Irr|MaTT would try from the south. We were met with mixed results. We managed to secure the inside of the tunnel system from the north, but were unable to break through from the south. With a second attempt from MaTT and a little help given from the rest of us, we managed to isolate and eliminate the Militia hold-outs.
Boogy was left defending Tunnels for a bit while our squad moved out towards the next flag atop the large hill overlooking the rope bridge and river below, near the center of the map. Trying to be sneaky, we grappled up the rock-face from the south and pushed up the hill while facing little resistance. We quickly capped the flag and engaged a few more stragglers to the north. Once everything appeared all clear and our friendlies moved in to secure the area, we once again moved out to South Facility.
However, throughout the remaining course of the round, we continued to leap-frog back and forth between the flags we had previously capped. Once we left one objective, the remaining defenders would be overwhelmed and pushed off the flag. We would come back, secure the flag, move towards the next one and the same process would happen over again.
It was quite an exhausting round.
Ending screenshot:
"Jafar, show me a sniper rifle." - Silly_Savage 2013
-
hx.bjoffe
- Posts: 1062
- Joined: 2007-02-26 15:05
Re: [AAR] Jigsaw's Zero Death Challenge
RPG-team loosely attached to a couple of inf squads on Ramiel this weekend.
Not all that many kills total, but we shot down a good few hummers, strykers and choppers.
Me, brother alex, silly savage(civ) and dbzao. Only SL got killed, once, rest of squad zero deaths.
Video gives the short version;
Not all that many kills total, but we shot down a good few hummers, strykers and choppers.
Me, brother alex, silly savage(civ) and dbzao. Only SL got killed, once, rest of squad zero deaths.
Video gives the short version;
Last edited by hx.bjoffe on 2010-06-08 10:06, edited 1 time in total.
-
Epim3theus
- Posts: 1110
- Joined: 2007-01-03 13:23
Re: [AAR] Jigsaw's Zero Death Challenge
Pretty blackhawk down that was. Pretty awesome.
If you can read this the ***** fell off.
-
Silly_Savage
- Posts: 2094
- Joined: 2007-08-05 19:23
Re: [AAR] Jigsaw's Zero Death Challenge
Whose the twat bubbling on and on?hx.bjoffe wrote:RPG-team loosely attached to a couple of inf squads on Ramiel this weekend.
Not all that many kills total, but we shot down a good few hummers, strykers and choppers.
Me, brother alex, silly savage(civ) and dbzao. Only SL got killed, once, rest of squad zero deaths.
Video gives the short version;
T'was a fun round indeed. Db only had one death because his body glitched in a building and couldn't get revived.
Anyways, two quickies.
Tactical Gamer - Yamalia - Russia
Joined the game late in the round, roughly fifteen minutes left.
I worked alongside Portable.Cougar's squad as a H-AT operator, destroying multiple LAVs, while Viking's BTR-80A supported us. We fought mostly in and around the large trench system until we managed to push them back to their main and capped them out, thus ending the map quickly.

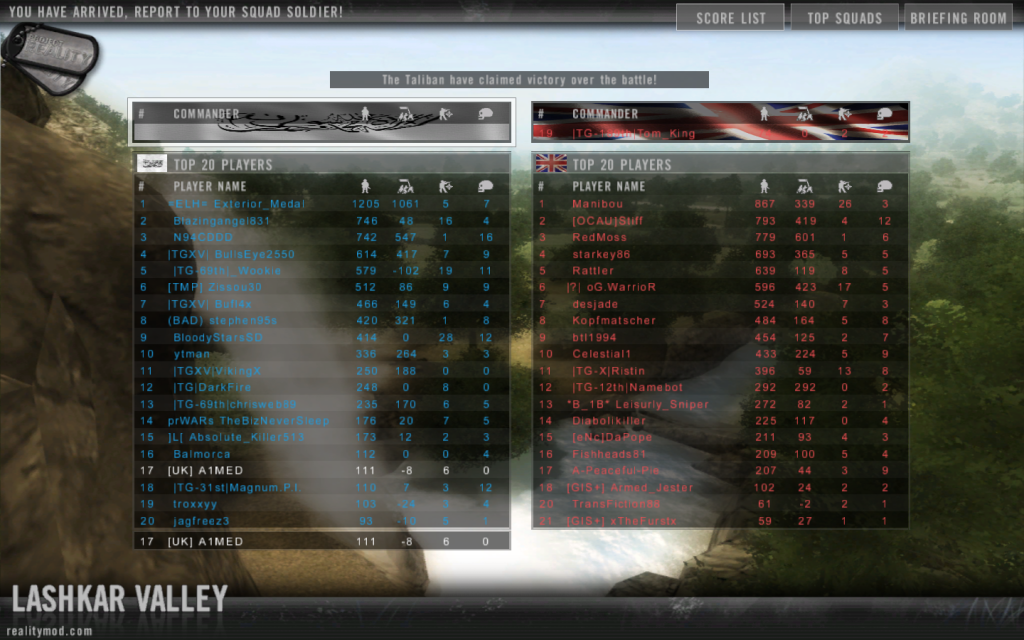
*]H[* HARDCORE Insurgency +2 - Lashkar Valley - Taliban
After TG crashed, I decided to hop on the HARDCORE server to play out the rest of the round. Hooked up with TomDackery and Zissou and headed to the Coalition main to harass any troops holed up inside (Note: This tactic is allowed on their server).
We spent the rest of the round sniping any Brit foolish enough to peek their head out, whilst they popped smoke in desperation as they tried to revive their fallen comrades. A big thanks to Zissou for reviving me a couple of times as an enemy sniper played Jack-in-the-box to try and counter-snipe us.

"Jafar, show me a sniper rifle." - Silly_Savage 2013
-
Jman234
- Posts: 90
- Joined: 2009-05-17 16:27
Re: [AAR] Jigsaw's Zero Death Challenge
We got around 13,000 points in that squad until I had to leave and I never died.


-
xxkillerxx69
- Posts: 95
- Joined: 2008-09-28 02:46
Re: [AAR] Jigsaw's Zero Death Challenge
I have had a lot of no death rounds since you started this thread but I really haven't been posting so I'll post this one seeing I had to stay alive for over 2 hours

I played a round on yamalia a couple of days ago on tg as Canadians at the start i was going to do lav but I decided to squad lead it ended well . So on to the story the first thing we did was attack echo flag which right away we started taking fire from btrs and inf most of my squad died so I called a retreat. Then the commander told us to defend bravo so we did that for about an hour of the round running back and forth between the trench systems killing all the little rambos and squads we could fine. Then commander told us we needed to cap November since our team finally got echo after hours of fighting so I got a heli ride to November. I was expecting to be killed and wiped out but lucky for us we got the drop on the enemy squad at November killed them, knifed the fob then continued to defend November for the rest of the round right at the end 2 of my guys left and we almost lost November. but I stayed alive and won?! (not really we lost by 12 tickets) here is the screenshot of our squad being number one even though 2 left 

I played a round on yamalia a couple of days ago on tg as Canadians at the start i was going to do lav but I decided to squad lead it ended well
-
Jigsaw
- Posts: 4498
- Joined: 2008-09-15 02:31
Re: [AAR] Jigsaw's Zero Death Challenge
So, after a little bit of time off i've got two rounds over the last couple days to tell you about 
Tactical Gamer - Operation Archer - Canadians
Final KDR -> 7 - 0
The round started I was invited to join [R-DEV]Bosco's "LAV1" squad. We spent a few minutes waiting for the LAVs to spawn and when they did, we rolled out briefly to support an infantry squad that was heading up to airfield. Whilst moving along roads East of the fortress we were ambushed and Bosco/Stratolite's APC was destroyed and mine was smoking badly after a couple of RPG hits.
We RTB'd and once the other LAV re-spawned we decided to go up through the far Western roads past the village and approach the airfield (where numerous hostiles had been reported) from the hills overlooking it to the West. After spending about 20 minutes moving up there we got into position and immediately spotted a mass of Taliban in and around the control tower, who proceeded to have a very bad day as we bombarded them from afar. Several times enemy tried to sneak up on us, including a lucky moment when a Taliban bomb truck exploded within about 50m of my APC, and this eventually culminated in the demise of my APC.
My gunner, [MPN] Whiskey27, had by now got about 15 kills from the insurgents in the airfield but as we moved back from the airfield up into the hills an enemy combat engineer got close. Not realising what kit he had I got out to get rid of him on foot, only for him to lay an arty IED down and blow himself, Whiskey and our APC sky high. Miraculously I survived the blast and decided to just go infantry, taking a grenadier kit.
The rest of the round was spent engaged in skirmishes around airfield and then over to the East of the central village, supporting friendly troops whilst they attempted to take down the caches. This included one particularly incredible moment, where I has halfway up the castle hill close to the rope bridge. An enemy with a PPSH snuck up on me and started firing. Desperately I scrambled up the hill and then started to slide as I scoped in, killing the insurgent as I slid down the hill


=MeRk= UK REALITY - Silent Eagle - US
Final KDR -> 6 - 0
I started off this round making a mechanised infantry squad, moving quickly over to the first flag after airfield which was clearing. We set a firebase and capped it as fast as we could, avoiding setting any defences so we could move quickly to contest the central village. My Bradley dropped my squad in the South Eastern corner of the central village and we built a second firebase, then advanced North whilst the Bradley provided cover to our SE.
Other members of our team had already started to assault from the West of the village but had taken a few casualties so we moved up quickly into the NE of the village next to the church. Catching the Russians on their flank we were able to take down several hostiles which allowed the rest of our team the opportunity to move foward and get into the cap radius, eventually leading to us capping it.
In doing this the Russians sensibly flanked us and most of my squad went down as they came down from the North. Three of us got out although one was killed by a lucky grenade as we pulled back, but this was enough for us to re-group with the rest spawning on a nearby FOB.
We re-established ourselves back in the SE of the village and built a FOB, fending off a few lone Russians and providing support for another squad that were more central in the village as the rest of the team pushed on to the next flag; tunnel complex. Once they had capped tunnels we moved to reinforce by Chinook, and after getting dropped off at the power plant we requested supplies.
Disappointingly, the server crashed at this point which was a big shame as it had been a quality game
http://www.youtube.com/watch?v=8CKjNcSUNt8
"I love the smell of napalm in the morning. You know, one time we had a hill bombed, for 12 hours. When it was all over, I walked up. We didn't find one of 'em, not one stinkin' dink body. The smell, you know that gasoline smell, the whole hill. Smelled like... victory. Someday this war's gonna end... "
"I love the smell of napalm in the morning. You know, one time we had a hill bombed, for 12 hours. When it was all over, I walked up. We didn't find one of 'em, not one stinkin' dink body. The smell, you know that gasoline smell, the whole hill. Smelled like... victory. Someday this war's gonna end... "
-
Silly_Savage
- Posts: 2094
- Joined: 2007-08-05 19:23
Re: [AAR] Jigsaw's Zero Death Challenge
Tactical Gamer - Asad Khal - IDF
At the beginning of the round, I joined db's infantry squad. Right as the round began, we quickly made our way to an open-top HMMWV and hauled *** to the east of Mansion to prevent Hamas from building any hideouts there. We all got out and soon came under fire from the Mansion rooftop. We took cover behind our HMMWV and the low berms in front of us.
They eventually called in a couple of technicals to try and eradicate us, but to no avail. We ended up completely emptying a full technical of enemies aside from the driver, whom made a hasty retreat. However, the enemy was relentless and started charging our position. Enemy RPG gunners and grenadiers started honing in on our position. At one point, I was the soul survivor but managed to grab the medic kit and get our squad back up.
With friendlies attacking from the west, we made a desperate rush to the Mansion. We quickly cleared out the remaining hostiles and moved to the roof to defend. After a while of defending with no signs of the enemy, we started to push towards the next flag. For the remainder of the round, we attempted to push the enemy off the flag by gaining the high ground. Every time we'd gain some ground, we would be overwhelmed and forced to retreat. At one point we called in mortars to soften the area up. Just as we were moving in to check for survivors, the round ended.
Ending screenshot:
"Jafar, show me a sniper rifle." - Silly_Savage 2013
-
andy1123
- Posts: 33
- Joined: 2009-04-07 12:26
Re: [AAR] Jigsaw's Zero Death Challenge
sweet haha xD!
-
Minion508
- Posts: 31
- Joined: 2010-06-12 19:01
Re: [AAR] Jigsaw's Zero Death Challenge
Nice. I would like to see you on the battlefield on my side.
-
Silly_Savage
- Posts: 2094
- Joined: 2007-08-05 19:23
Re: [AAR] Jigsaw's Zero Death Challenge
A few quick ones to skim over.
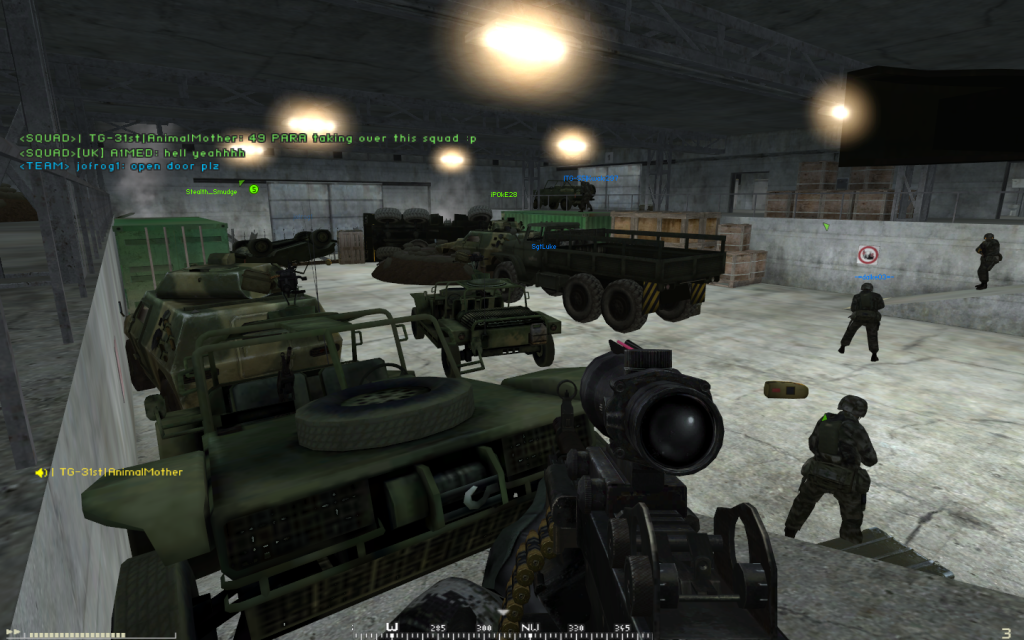
Tactical Gamer - Operation Barracuda - U.S.M.C.
Joined chrisweb's squad fairly early in the round, along with a few of the |?| guys. We quickly assaulted and secured the Airfield flag thanks to our APC support provided by Lt_Doobie and crew. We then dug in and defended the flag for a bit while the rest of the team blitzkrieg'ed the next several flags.
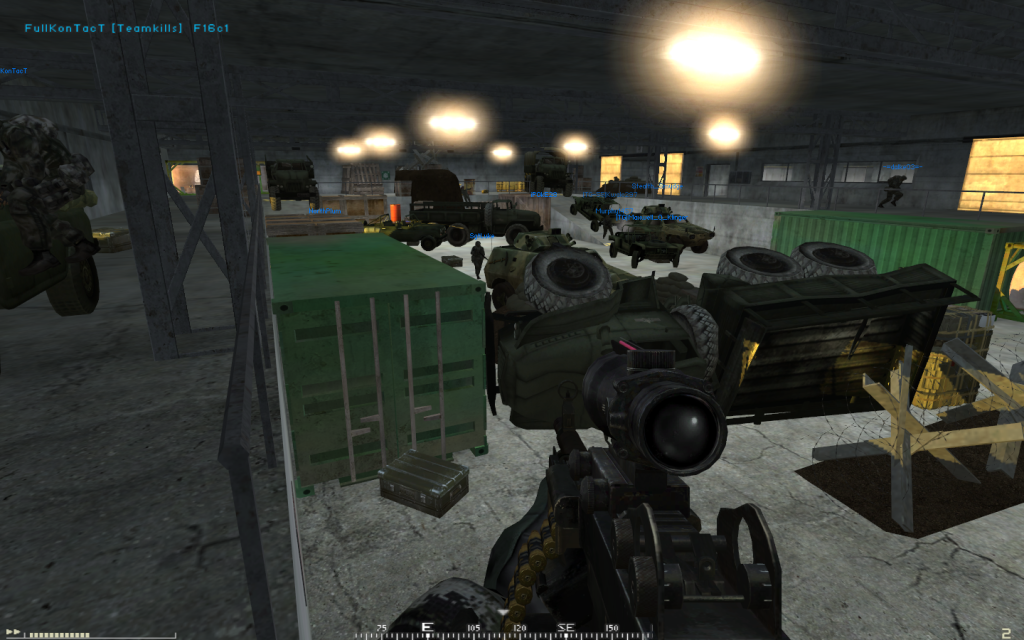
As the PLA Missile Silo was just coming in to play, we all boarded a Huey and flew straight to the flag. Once we landed, we hastily made our way down into the corridors of the silo, careful not to fire on any PLA stragglers. We stayed on the flag until it was in play and continued to hold our position, guarding each entryway. Unbeknown to our SL, their vehicles were able to teleport through the main door and come face to face with a few of us. The first several vehicles were easily destroyed through small arms fire alone.
However, they soon became wise to our tactics and sent down a VN3. We had nothing to defend ourselves with, so we tried our best to stay alive. Eventually, all but our medic went down due to the overwhelming enemy presence. Luckily for us, Zissou went ape-shit on the few remaining attackers and managed to revive everyone besides me, as I was glitched in a few supply crates.
With the flag fully in our possession, I decided against giving up, hoping Zissou would manage to get me up at some point. The round ended before I bled out.
All in all, it was a fairly short round due to the cap out.
Ending screenshot:

Tactical Gamer - Karbala - U.S. Army
This was both a fun and interesting round.
Joined the game about ten minutes into the round and squaded up with Mnam as their medic. They were deep inside the city, whilst I was stuck at main. I attempted to regroup with them by slowly making my way south of main, following the river. Just as I reached the city outskirts, I came under fire. At first I believed it was simply a lone gunman on the roof. Seeing how my squad needed my assistance, I attempted to bypass the shooter.
However, what I believed to be a single insurgent turned out to be over a squads worth, pouring out of a building. I was soon engulfed in enemy fire, including PKM and RPG rounds. I quickly hit the deck and notified the SL of a possible cache on my location. I stood up to confront my attackers, and saw them starting to overrun my position. I was in a rut; on one side, the enemy, on the other the river.
Unable to withdraw, I held my ground and began returning fire on the insurgents. One by one, they all went down. Unfortunately for me, they kept respawning and were again trying to outflank me. At this point, my squad had been wiped out and respawned at main. I desperately cried out for some backup. They informed me there was no vehicles at main so they hoofed it to my position as quickly as they could.
With enemies right on top of me, I assumed I was a goner. I could hear them running right next to me, and just as I was about to be overrun, a massive volley of gunfire zipped over my head and I heard insurgents cry out in agony as they dropped. My squad had arrived. They started laying down some serious cover fire as I broke from what little cover I had and rushed back to the safety of the berm my squad was behind. Easily one of the most exciting moments of PR I've witnessed. I really with I could have recorded the assault; it was something out of a movie.
We then moved on the suspected cache location, wiping out any insurgents that happened to get in our way. Once the area was clear, we found what we were looking for and quickly destroyed the cache. We continued on our way deeper into the city, looking for any signs of enemy activity.
This is where it got fun. |TG-X|Ristin volunteered to be our complimentary DJ and started playing requests. We started rocking out to the likes of Katy Perry and Justin Bieber on our escapade through the city.
Unfortunately, every time we recevied intel on a possible cache location, the rest of the team would beat us to it. We essentially played catch-up the rest of the round. Cache after cache went down, minutes after intel was received thanks to our CO, |TGXV| DiscoJedi and his handy UAV.
It was probably the quickest round of Karbala I've ever played, lasting maybe half an hour at best. It was ridiculous.
Ending screenshot:

HARDCORE Insurgency +2 - Kashan Desert - M.E.C.
Not much to say here. Originally started out lasing targets for CAS as a sniper. Unfortunately, our pilots seemed to have other, more important matters to attend to, and my targets went unscathed.
Eventually I gave up trying to spot for CAS and spent the rest of the round taking out targets of opportunity.
Once again, another very fast round. We steamrolled their team and capped them out thanks to our tank crew, N94 and Obscurum, whom destroyed any threat our team faced.
Ending screenshot:

Tactical Gamer - Operation Barracuda - PLA
To be honest, I'm not very certain of the specifics regarding this round.
Our squad, led by |TG-69th|Gijoe, went around taking out any U.S.M.C. squad we came up against.
We eventually wore down the enemies tickets enough to win the game. Again, I'm having a hard time remembering this round... ??:
Ending screenshot:

Tactical Gamer - Operation Barracuda - U.S.M.C.
Joined chrisweb's squad fairly early in the round, along with a few of the |?| guys. We quickly assaulted and secured the Airfield flag thanks to our APC support provided by Lt_Doobie and crew. We then dug in and defended the flag for a bit while the rest of the team blitzkrieg'ed the next several flags.
As the PLA Missile Silo was just coming in to play, we all boarded a Huey and flew straight to the flag. Once we landed, we hastily made our way down into the corridors of the silo, careful not to fire on any PLA stragglers. We stayed on the flag until it was in play and continued to hold our position, guarding each entryway. Unbeknown to our SL, their vehicles were able to teleport through the main door and come face to face with a few of us. The first several vehicles were easily destroyed through small arms fire alone.
However, they soon became wise to our tactics and sent down a VN3. We had nothing to defend ourselves with, so we tried our best to stay alive. Eventually, all but our medic went down due to the overwhelming enemy presence. Luckily for us, Zissou went ape-shit on the few remaining attackers and managed to revive everyone besides me, as I was glitched in a few supply crates.
With the flag fully in our possession, I decided against giving up, hoping Zissou would manage to get me up at some point. The round ended before I bled out.
All in all, it was a fairly short round due to the cap out.
Ending screenshot:
Tactical Gamer - Karbala - U.S. Army
This was both a fun and interesting round.
Joined the game about ten minutes into the round and squaded up with Mnam as their medic. They were deep inside the city, whilst I was stuck at main. I attempted to regroup with them by slowly making my way south of main, following the river. Just as I reached the city outskirts, I came under fire. At first I believed it was simply a lone gunman on the roof. Seeing how my squad needed my assistance, I attempted to bypass the shooter.
However, what I believed to be a single insurgent turned out to be over a squads worth, pouring out of a building. I was soon engulfed in enemy fire, including PKM and RPG rounds. I quickly hit the deck and notified the SL of a possible cache on my location. I stood up to confront my attackers, and saw them starting to overrun my position. I was in a rut; on one side, the enemy, on the other the river.
Unable to withdraw, I held my ground and began returning fire on the insurgents. One by one, they all went down. Unfortunately for me, they kept respawning and were again trying to outflank me. At this point, my squad had been wiped out and respawned at main. I desperately cried out for some backup. They informed me there was no vehicles at main so they hoofed it to my position as quickly as they could.
With enemies right on top of me, I assumed I was a goner. I could hear them running right next to me, and just as I was about to be overrun, a massive volley of gunfire zipped over my head and I heard insurgents cry out in agony as they dropped. My squad had arrived. They started laying down some serious cover fire as I broke from what little cover I had and rushed back to the safety of the berm my squad was behind. Easily one of the most exciting moments of PR I've witnessed. I really with I could have recorded the assault; it was something out of a movie.
We then moved on the suspected cache location, wiping out any insurgents that happened to get in our way. Once the area was clear, we found what we were looking for and quickly destroyed the cache. We continued on our way deeper into the city, looking for any signs of enemy activity.
This is where it got fun. |TG-X|Ristin volunteered to be our complimentary DJ and started playing requests. We started rocking out to the likes of Katy Perry and Justin Bieber on our escapade through the city.
Unfortunately, every time we recevied intel on a possible cache location, the rest of the team would beat us to it. We essentially played catch-up the rest of the round. Cache after cache went down, minutes after intel was received thanks to our CO, |TGXV| DiscoJedi and his handy UAV.
It was probably the quickest round of Karbala I've ever played, lasting maybe half an hour at best. It was ridiculous.
Ending screenshot:
HARDCORE Insurgency +2 - Kashan Desert - M.E.C.
Not much to say here. Originally started out lasing targets for CAS as a sniper. Unfortunately, our pilots seemed to have other, more important matters to attend to, and my targets went unscathed.
Eventually I gave up trying to spot for CAS and spent the rest of the round taking out targets of opportunity.
Once again, another very fast round. We steamrolled their team and capped them out thanks to our tank crew, N94 and Obscurum, whom destroyed any threat our team faced.
Ending screenshot:
Tactical Gamer - Operation Barracuda - PLA
To be honest, I'm not very certain of the specifics regarding this round.
Our squad, led by |TG-69th|Gijoe, went around taking out any U.S.M.C. squad we came up against.
We eventually wore down the enemies tickets enough to win the game. Again, I'm having a hard time remembering this round...
Ending screenshot:
"Jafar, show me a sniper rifle." - Silly_Savage 2013
-
Conman51
- Posts: 2628
- Joined: 2008-05-03 00:27
Re: [AAR] Jigsaw's Zero Death Challenge
BUMP
People should start doing this again.
Maybe try in in PR ARMA or PR Vietnam now.
People should start doing this again.
Maybe try in in PR ARMA or PR Vietnam now.
"It's not the size of the dog in the fight, it's the size of the fight in the dog."
-Mark Twain
-Mark Twain

-
Arnoldio
- Posts: 4210
- Joined: 2008-07-22 15:04
Re: [AAR] Jigsaw's Zero Death Challenge
I dont always SS every no-death round. But when i do, i forget to post.
This one might be old.


This one might be old.
Orgies beat masturbation hands down. - Staker