


SUMMARY OF INSURGENT INFANTRY
The insurgent has less firepower and equipment available than most conventional armies, however that does not mean the insurgent is less capable of destruction or damage to the opposing force. The enemy rifleman have access to optics ranging from EOtech, reflex and 4x scopes, while your insurgent only has access to the standard iron sights. Therefore, your effective engagement distance is a lot shorter than the enemy. It is a must that the insurgent sneaks up on the enemy before firing or even better gets a good flank on the enemy, it may be necessary at times to even follow the enemy until advantage conditions arrive. The insurgent must use hit and run tactics, bait and ambush tactics, traps and remote explosives.
The goal of the insurgent is to force out the occupation of enemy forces, to revolt against primary control of forces in the area, that means the insurgent is not limited to one role, but can swap roles to complete the objective.
MR INNOCENT
The insurgent features a very powerful method of deception. Due to the coalitions rules of engagement, they are not allowed to kill unarmed civilians. You can drop your kit in a location, walk around and survey the area, locate enemies, return to your kit and plan your attack.
If you need to retreat and are surrounded by enemy, you can also drop your kit and run away. While it is true that there is a time limit before you are really considered a civilian, majority of the time players do not know how long you have used equipment, weapons or picked up a kit. therefore the appearance of being unarmed works well enough, or if needed, you can hide and wait until you have the ROE penalty, but note that the enemy might be searching the area for you.
This is especially helpful if you need to retrieve a vehicle, such as a technical in a open area. Please note that the sapper is the only class that looks exactly like a collaborator, as they both wear matching white suits.
Be sure to raise your hands if you spot enemies, at far ranges, they may mistake you as a armed insurgent and fire, because you just dropped your kit, you will not have the ROE penalty, but they don't know that.
SITUATIONAL AWARENESS
There are 3 levels of situational awareness.
Undetected by the enemy, this gives you the best advantage, as you know their positions but they don't know yours.
Detected by the enemy, this puts you at a even match up, as you know where your enemy is, and the enemy knows where you are. However, because conventional armies have more firepower, this is not a good for you. Close Air Support from the enemy or enemy advancement on your position is most likely as they will probably have more support or numbers than you.
Detected by the enemy, taking fire and unable to locate enemy positions. This is the worst situation to be in, the best option is to retreat and try and locate the enemy.
If you are undetected, it is important to figure out when is the best time for you to attack, the insurgent has the most advantage in pre-planning a attack on the enemy, in a mutal firefight, because you are alone. If you get killed, there is likely no one coming to your rescue to revive you. Where as the enemy will probably be working together and have a medic on standby to revive people you take out. However, you can use downed targets as bait.
SLICING THE PIE

It is not necessary to always be close to the cover when engaging targets around the corner. This diagram shows the correct position on where to engage targets in the pie.

It is absolutely important you know how to slice the pie, not only is pie good and tasty, it will also save your life and allow you to engage multiple targets.
MOVING AND CONCEALMENT
First step is to give yourself some situational awareness, peeking around corners by sidestepping in and out of cover quickly to see what is in front of you. Use binoculars if you have to observe far distances, or suspicious looking objects.
The next step once you've located all your targets, check your map to locate the safest route to flank the enemy. As a insurgent, you must attack from areas where the enemy is not expecting you or move to a position where you can fire on the enemy as they move up.

light grey is a wall that can be climbed over
Usually depending on the cover, there are 2 positions to fire, the left or the ride side. A 3rd option becomes available if roof access is allowed.
Be sure to alternate between firing positions to reduce the chance of being a fixed target.
Always try and get closer to the enemy before they see you. You want to use anything to obstruct the vision of sight before engagement. You always want to find your own building or cover, as teammates will draw fire and alert your presence to the enemy.
If you manage to get close enough to the enemy and unnoticed, throw grenades before firing your primary weapon. It will take out more targets and allow your primary weapon to mop up survivors.
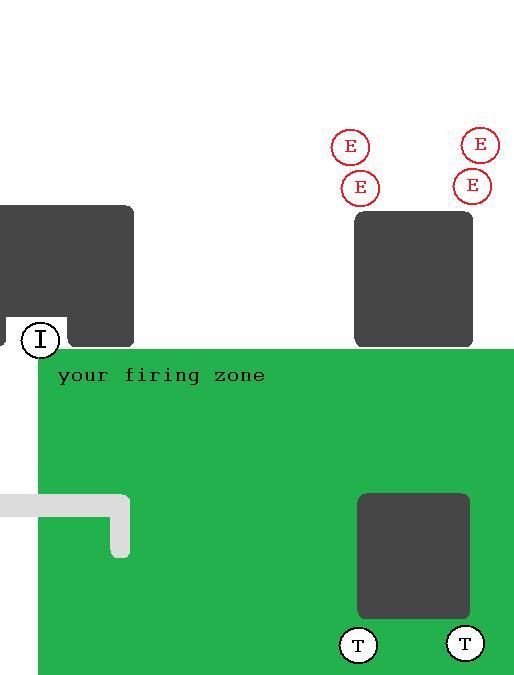
Stay concealed, if there are too many targets, wait until the enemy travels into your firing zone before engaging. If the enemy is already engaging your teammates, they will have a difficult time figuring out that it is you who is actually picking them off, and not your teammates.
Use downed enemies as bait for medics. And when the medic goes to revive, get your free kill.
Be sure to check your flanks to ensure the enemy is not flanking you.
LOOTING ENEMY EQUIPMENT, UNIFORM AND WEAPONS
As with the new version of PR, only certain enemy kits can be obtained by your insurgent, only rifleman kit, rifleman Antipersonnel, Rifleman Specialist and the LAT kit is obtainable without the timed meter. You can use other kits but a timer will kill you if you hold onto the enemy kits for too long.
If you kill a enemy medic, be sure to use all the epipens in the kit so they cannot revive any of the players you have killed, this forces them to resupply and allows you more time to hunt the remaining survivors.
If you use the enemy kit, when others see you at far ranges, they may mistake you as one of their own, caution this also works for teammates as well! Be careful not to get team killed!
To be continued.. SAPPING + SNIPING + VEHICLES


